
Everything You Need to Know to Photograph the Prolific 2016 Perseid Meteor Shower
The 2016 Perseid Meteor shower peaks this weekend and astronomers believe it could be a shower for the ages with rates up to 200 meteors per hour. Perseid meteors are small pieces of debris from the comet Swift-Tuttle. Usually Earth grazes the edge of this debris, but thanks to the gravitational pull of Jupiter, this year we will plow straight through the middle of it.

Where to See Perseid Meteors
They radiate from the constellation Perseus in the northeastern sky, although you will be able to see them in all parts of the sky. The most important thing is to at a dark location, far away from city lights. To view light pollution in your neck of the woods, I suggest using lightpollutionmap.info.
This map shows the intensity of light pollution. Red areas are the brightest and gray areas are the darkest. While one could conceivably see the brightest of meteors in a Red, Orange or Yellow area, you will have a much better chance from darker skies. I recommend shooting from at least the green regions. While Green and Blue zones will yield fantastic results, getting yourself into Gray regions will present an explosion of stars for your eyes and camera.
When to Watch for Meteors
The shower officially peaks during the early morning hours of August 12th and 13th, but the days preceding and following will hold potential as well. The best time to view them will be from after midnight (when the crescent moon begins to set) until just before dawn, but early birds venturing out just after sunset could be rewarded with an Earth grazer fireball, which are especially bright and low in the sky.
Of course, the weather will have an impact on the number of meteors you will be able to see, as it is tough to see meteors through clouds. A quick look at your 5 day forecast from your local National Weather Service office will give you a good idea of what conditions will be like for the weekend.
If conditions are favorable, then refer to Clear Dark Sky. This website provides an astronomer’s weather forecast for the next 24–48 hours. It gives you a forecast for cloud cover, humidity, temperature and other conditions which will help you better plan your shoot.The website offers forecasts for thousands of locations across North America.
The above image shows various rows with each column corresponding to an hour of the day. The site gives you a legend showing the meaning of each row. The most important rows for astrophotography are cloud cover and darkness. Cloud cover tells you how clear or cloudy the sky will be. While I do like some clouds for my photography, coverage over 50% can be troublesome. Darkness shows you how dark the sky will be. Dark blue is the darkest and light blue means the Moon’s or rising/setting Sun's effect will brighten the night sky. Daylight hours are depicted with white.
What you Need to Photograph the Perseid Meteor Shower
Photographing the Perseid's requires
Meteor over a thunderstorm. Coldwater, Kansas f/4.0, 20 seconds, ISO 4000
- Camera capable of shooting long exposures (I shoot with a Canon 6D and 5D Mark II)
- Wide angle lens. The wider, the better chance of catching something good. I use a 16-35mm f/2.8 and a 17-40mm f/4.0.
- Sturdy Tripod. I like ProMaster tripods. They are affordable and have good quality.
- Intervalometer or Remote. There are a wide variety of these, ranging anywhere from a few to hundreds of dollars. I have an expensive one and a cheaper one. Each function about the same.
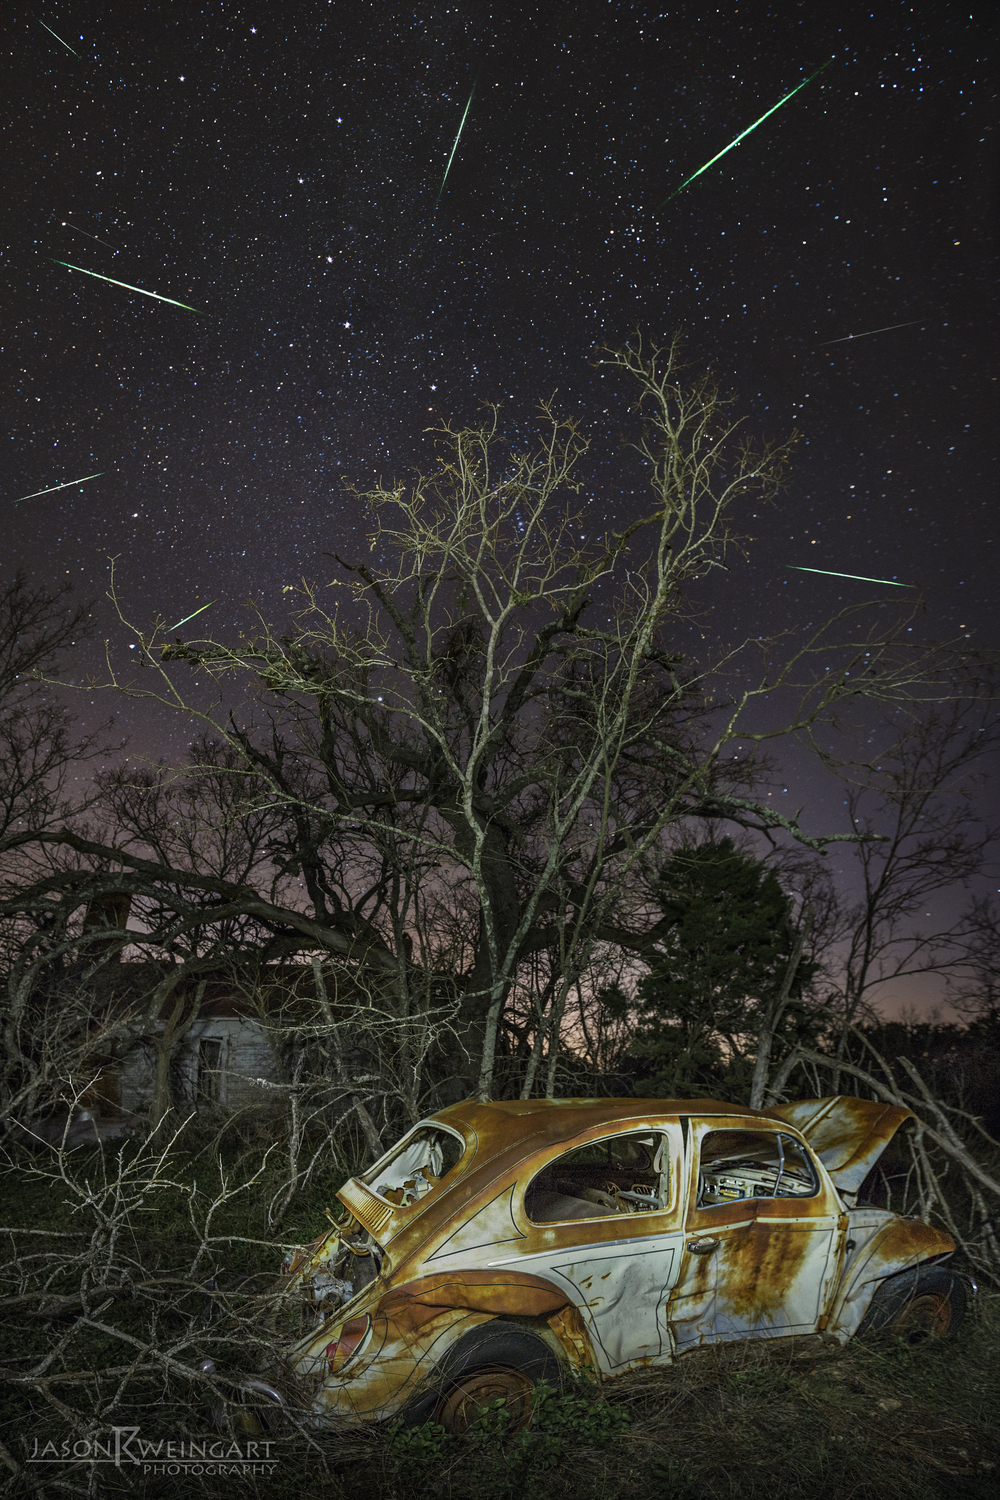
How to Capture a Perseid
Settings for shooting a meteor shower are a lot like what you would use to photograph the Milky Way. You will be using high ISO (1600-6400), with longer shutter speeds (15-25 seconds), and your lens wide open (f/2.8 or lower to f/5.6).
FOCUSING
Since we are focusing on the sky, we will need to set our focus to infinity. When focusing on a totally dark scene, it will be nearly impossible to use autofocus. You will need to switch to manual focus and use your LCD preview screen to see what you're doing. To achieve tack sharp focus. I generally focus on a distant light or bright star by enlarging it using the zoom feature on the preview screen.
SHUTTER SPEED
Given that the Earth rotates, objects in our night sky appear to move over time. This is called parallax and is what creates star trails in images. When you're shooting extraterrestrial objects you must be aware of this or your sky won't be sharp. So without getting into the world of star tracking mounts, you will only be able to have your shutter open for a limited amount of time.
You can calculate your maximum exposure time by using the 500 rule, which is as follows...
500 / (focal length x crop factor of your camera) = maximum exposure time
Full frame sensors have a crop factor of 1x, so they are able to achieve longer exposures without showing parallax than APS-C (crop) sensors which have crop factors of 1.5x and 1.6x, depending on make and model. Using this rule, I can calculate the exposure for my full frame Canon 6D with the 16-35mm f/2.8 L II when shooting at 16mm focal length.
500 / (16 x 1.0) = 31.25 seconds
APERTURE (OR F/STOP)
The wider your aperture is open, the smaller the number. You're going to want to let in as much light as possible, so you will mostly be shooting at your maximum aperture.
For example the 16mm lens I use has a maximum aperture of 2.8, so that is usually my f/stop for my night sky photos.
The only issue with this is maximum aperture yields the least depth of field (sharpness or lack there of) in your image. If you focused on infinity your sky will be sharp, but you're foreground won't. I often will take a second exposure, and refocus on the foreground so I have both a sharp foreground and sharp sky. I usually shine a flashlight on my foreground object, then focus in the same manner previously described.
ISO
If you're not dealing with much in the way of light pollution, you will want to use the maximum ISO your camera is capable of before noise starts to degrade image quality. For a Canon 6D, that's around ISO 6400, so I usually shoot with my ISO there. I also try to fire off a few exposures at lower ISO's as well since images shot at a lower ISO are less noisy.
COMPOSITION
The Milky Way will also be visible during the Perseid's. So consider aiming a camera towards it, adding another element to your image. Try lighting your foreground with a flashlight or speedlight. Images with detail in the foreground are a lot more interesting than those with a pure black foreground.

Milky Way rising from Study Butte-Terlingua, Texas.
While a lot can be said for The Rule of Thirds and The Golden Rule in composition, I believe the most important thing is that your image has a definite foreground, middleground, and background.
Find a composition you are happy with then start your intervalometer and begin shooting continuously to create a timelapse. Sit back and enjoy the show. I would advise staying out for at least a couple of hours if possible. Coordinate with your friends to cover different parts of the sky and let each other know when a meteor is spotted.